Excellent replacement for all single motor 110 volt central vacuums with a separate relay/transformer/breaker or with a single control board. Some retrofitting may be required.
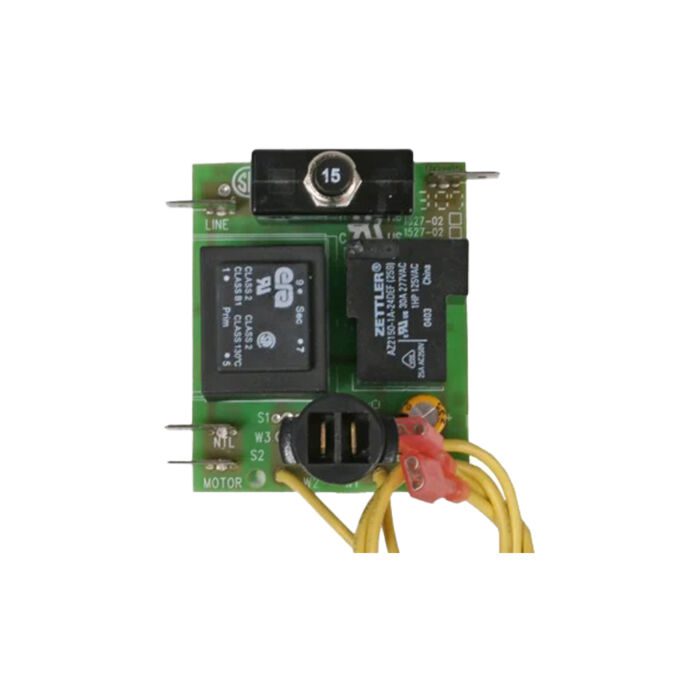
Compatible and Durable. This very durable, industry standard, Alutron control board contains a relay, transformer, 15 amp mini breaker, and two pairs of low voltage leads (wire set and black tower with flag terminals).
Installation. Circuit board control module is 2″ high from board to top of reset button. The reset button and low voltage stems are threaded. When put through holes in the body of the vacuum, the two stems hold the board in place with two included thin mounting nuts. If you don’t have a proper hole for installation you can use a drill and step bit to create proper holes. NOTE: It is recommended that an electrician should install this board. It should take them less than an hour.
Wiring. Click on the photo and print it to use as a wiring guide. The connections are 1/4″ flag terminals. We recommend purchasing quarter inch female flag terminals to put on the motor and power cord wires, or buying our wire set with terminal ends and striping them into the wires with wire nuts. Wiring locations on the board:
“LINE”: The 110 volt line (usually black) from the power cord
“NTL”: The neutral wire from the power cord (usually white)
“MOTOR”: Connect either wire from the motor to this contact
“MOTOR”: Connect the other motor wire to this contact. Vacuum motors are polar neutral it doesn’t matter which motor wire goes to which motor board contact.
Black Tower: The low voltage wires from the home will attach to the two 1/4 inch male flag connectors inside the black tower part of the board. It doesn’t matter which wire goes to which side.
Yellow Wires: Attached to the board are low voltage wires that can ignored or go to an on/off low voltage switch on the side of the tank.








Reviews
There are no reviews yet.